Equipment
Camera
- 35mm single lens reflex with manual control over shutter speeds.
- The shutter speed range should be from 1 sec to 1 /1000 sec, at least to 1/500.
- Shutter speed controls should be easily adjustable.
- Test the camera before the eclipse.
- If the sun is high in the sky, you will need a right angle viewer.
- If you use an electronic camera, make sure the batteries are fresh and take along extras.
Lens
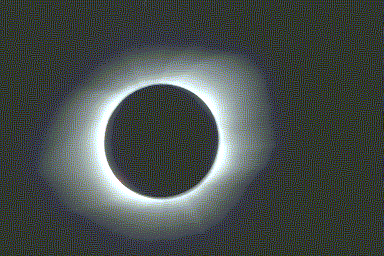
- Use a telephoto lens with focal length 400mm to 1000mm, f/5 to f/8. Optimum focal length is 600mm to get all
of the corona. Over 1000mm would be good only for prominences and the inner corona, since the outer corona extends
many times the sun's diameter.
- An achromat refractor is preferred over complex optical systems such as multi-element or mirror lenses, to
reduce internal reflections and ghost images.
Solar Filter
- Filters are needed for the partial phases only. The filter must be easily removable for total phases and for
the diamond ring.
- Use the filter for focusing before totality.
- When removed, the balance of the telescope should not change significantly.
- Wind should not be able to blow the filter off the telescope. (Some people mount aluminized molar over the
end of the telescope tube. While on ship once, I saw one of these blow off. This could instantly blind the observer.)
- Use a full aperture filter for critical focus. If possible, lock lens on best focus, perhaps with a thumbscrew.
Mount
- The mount should be very solid - solid enough to take exposures of one second or longer in windy conditions
with the lens to be used during the eclipse.
- Test your system long before the eclipse, perhaps by photographing the moon or sunspots with the solar filter
on your scope. The moon gives you the image scale you will get on the eclipsed sun. Place cardboard stops over
the objective during testing to allow one second exposures.
Finder
- Use one or two right angle finders at approximately 3x with a solar filter mounted over the objective. You
do not need to look through the finder during totality, so leave the filter on it at all times. Or remove the finder
from the telescope tube altogether until after the eclipse is over.
Visual
- Don't forget to look at the eclipse!
|
Film
What film to use
- Fine grain, slow transparency film is recommended. Kodachrome 64 is preferred with f/5 to f/8 systems. Kodachrome
25 would be good with f/5 systems. Transparency film is not subject to color shifts that happen when printing color
negatives. The disadvantage is the need to make one or more internegatives for prints later.
- If you decide to use print film, Kodak Gold 100 is a good choice with an f/10 optical system, such as a Meade
2045. This will give you a good solar corona at 1-sec. exposure, and good exposures of the diamond ring and prominences
at 1/1000 sec. The advantage of print film is the ability to get unlimited prints to share with friends or for
publication. However, conversion to slides can be expensive and cumbersome.
- Use 36 exposure rolls so you don't waste time changing film during the eclipse.
Processing Film
- Have the film processed by the best possible film processor (Kodak).
- Put a note with your film saying "Astrophotos, may appear blank, use care in cutting, mount all slides."
- Put name and address on the film cassette.
- Perhaps have the film returned uncut and mount it yourself. (However, there is more possibility of the film
being scratched this way since film is coiled up and returned in a film can.)
Preparation before Travel to Eclipse
- Determine exposures for partial phases of the eclipse by photographing the uneclipsed sun. Give consideration
to whether the sun will be high or low at your site during the eclipse.
- Assemble and use your particular setup to make sure it works properly. During the eclipse you won't have any
time for fixes or learning how to use your camera, etc.
Travel to Eclipse
- Pack telescope tubes and mount in a strong suitcase.
- If flying, carry the cameras, film and objectives aboard the aircraft as carry-on luggage.
- DO NOT let the film be X-rayed! X-ray damage is cumulative. One X-ray may not damage the film, but two or more
might. This is especially important with high speed film of ASA 400 or greater. Color shifts and pre-fogging that
drastically affect even slow films may result. (One way to help avoid X-rays on your film is to use a lead-lined
film pouch, available at camera stores.)
- Do not put the film in checked baggage because much more powerful X-rays are used with checked baggage.
- Get to as transparent a sky as possible, because the moon's shadow may cause the clouds to change. (On one
trip, the bus stopped just short of a very clear area. The trip leaders said sky conditions were OK. This kept
us from seeing the outer corona.)
|
Photographing the Eclipse
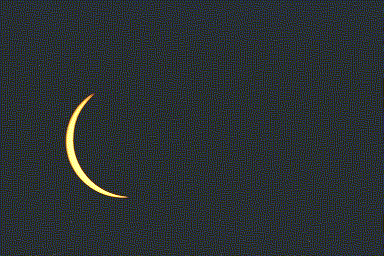
Partial Phases before Totality
- Take two or three pictures of ordinary scenery on each camera so you will know where to cut the film.
- Determine proper focus and lock the focus for the eclipse. (If you don't focus on the sun through a solar filter,
focus on a distant object many miles away.)
- Only take two or three frames, if any, of the partial phases before totality. Save your film for the much more
spectacular totality. Take your partial phase pictures after totality when you have time to change film.
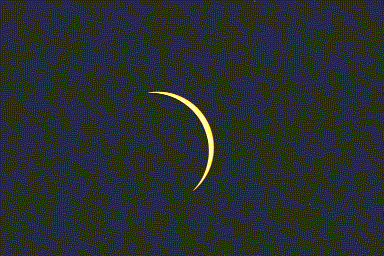
- Just before the start of the diamond ring, when the crescent sun starts shrinking, rapidly remove your solar
filter, set the camera to its highest shutter speed (1/1000 or 1/500 sec), and cock the shutter to be ready for
the diamond ring.
- If possible, use one roll of film to shoot the partial phases before totality, then, just before the eclipse,
rewind and remove this roll from the camera, making a note of how many frames you have shot. Make sure not to rewind
the roll completely, but leave enough leader to replace it in the camera later. Then, put in a new roll of 36 exposure
film just for the total phases. Either finish off the new roll after the eclipse, or replace the first roll in
the camera for the remaining partial phases.
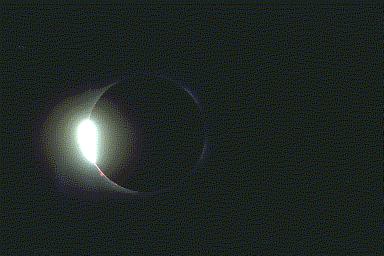
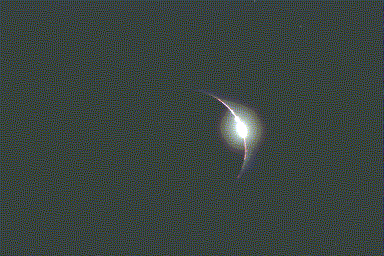
During Diamond Ring and Totality
- All viewing and photographing during totality is done without the solar filters. Totality would be invisible
through a solar filter. All photography of the diamond ring is also done without the solar filter. (Viewing the
diamond ring without a filter is somewhat hazardous, so I usually do it through the camera, which reduces the light
somewhat.)
- Photograph the diamond ring at your highest shutter speed (1/1000 sec).
- During totality, take one picture for each shutter speed on your camera, working from 1/1000 to 1 sec. Doing
this will take eleven frames.
- Be able to change shutter speeds without looking at the shutter.
- Perhaps take a few extra exposures at your longer shutter speeds, since blurring is more likely at these speeds.
Plus take a few extra at various other speeds.
- When you get to 1 sec, work back up to 1/1000 sec to get the diamond ring at the end of totality.
- Perhaps, during totality, have a tape player with a prerecorded tape stating how much time is left and that
the eclipse is 1/4, 1/2 and 3/4 over. It is also a good idea to leave a cassette recorder running during the eclipse,
to record your reactions, and the reactions of those sharing the eclipse with you.
- When the sun starts getting too bright after the last diamond ring, push the telescope way off the sun. Then
reinstall ALL solar filters and photograph the remaining partial phases.
- Remember - plan not to need to make focus or other adjustments during the short period of totality. The only
adjustments to make during totality are (1) center sun in the field, and (2) change shutter speeds.
- Again - Look at the eclipse. Don't just photograph it. Let it sink in what
you are seeing!
|


 Learn
the Constellations
Learn
the Constellations